Monday, January 2, 2012

Happy New Year From Pasadena

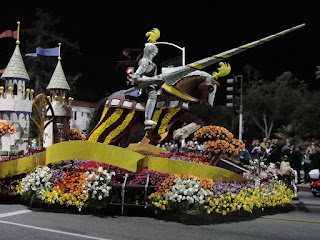
It is actually January 2nd, but the Rose Parade in Pasadena is today.  Last night my Husband and I went to visit our friend Susan who lives a block over from Orange Grove.   This is the magical street that holds the Valley Hunt Club and the Wriggley Mansion also known as Tournament House.  This is the step off for the most wonderful Parade in the world.  Macy's may have their balloons but Pasadena has amazing flowers, seeds, spices and technology.  They are totally amazing.  These Floats are built in other places like in Azusa 10 miles away.  They need to be driven to orange grove so bridges and street width all play a factor.  These float disassemble or fold themselves to accomodate.  Engineering feats of magic.  We went to preview the floats last night, what a blast.  I am up early so I can post these pictures before the parade is under way in another 45 minutes.   

That me doing the Rose Queen Wave

                                   The Sierra Madre Float is completely made by volunteers  
                                    This is folded over so it can avoid wires ect.                                     

                                                         Same Float different angle
                                            I think this is Paramount 100th Birthday Float
                         Same Float Bumble Bee Tansformer it is 11pm and dark so it is hard to see
                                          I couldn't get close enough to see who's float this is.
                                          Bandai/Nomaco Games
                               I don't know who it belongs to I'll have to watch this morning too
                                          Rear end of South PasadenaFloat
                                          Front end of South Pasadena Float
                                            Indonesia
                                                    I think this is Thailand
                                                     I don't know who this belongs too.
                    Same float.  They are bringing them on to Orange Grove so they are moving.
                                            Odd Fellows and Rebekahs
                                              HGTV front
                                           HGTV back and on the move
                                          I don't know who's float this is, but it was fantastic
                                           Same Float with leopard in forground
                                           Same Float Tiger and temple Beautiful!
                                           City of Torrance
                                           I don't know the crowds were getting much bigger
                                            Girl Scouts
                    I dont know who's float but I think he is a book worm but will be standing in the parade.
                          I don't know who's float but is looked like a tribute to Elizabeth Taylor

More floats were arriving and this isn't all of them.  It was great fun to walk around gawking at the floats and the crazy people from out of town in their Oregon and Wisconsin sweatshirts and caps.  It was a great way to spend the first day of 2012.   Happy 2012 to everyone!  May it be a prosperous and healthy year for all. 

Friday, December 2, 2011

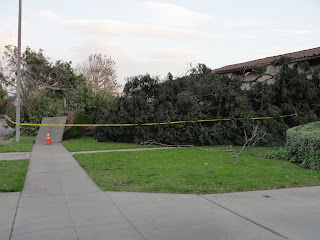
Aftermath of Southern California Wind Storm December 1st 2011

I have lived on the east coast and none of the hurricanes I experienced were as bad as the wind storm I just experienced.  Luckily our power was restored quickly after we lost power 6 times.  We are on the same power grid as the hospital so we always seem to get restored first.   It started late wednesday night around pm and just intensified.  I couldn't see anything flying about but I could hear the tents of the Christmas tree lot across the street being ripped off poles clamouring, sirens all night trees and  branches breaking the whole house shaking in the 97 mph winds.  It was the scariest night ever zero sleep.  In the morning this is what we found just in the one block where I live.  We couldn't get out we were being diverted to other streets and I drove around in a loop about 1 mile square it took me an hour.
Here are the pictures.  I don't think they do the destruction justice.


Friday, November 4, 2011

Polymer Clay Flowers

Don't forget tomorrow is the Los Altos Craft Fair everyone.  It runs from 10am to 3 pm.  You will be able to purchase handmade and manufactured products, baked goods, lunch and raffle tickets.  It is a fun day.  It takes place at the United Methodist Church.  The address is 5950 E. Willow (at Woodruff), Long Beach, CA  phone # is 562-598-2451.  Get a start on your holiday shopping and help a good cause.

I made these flowers out of Polymer Clay.  Don't they make cute earrings.  I made a set for one of my friends at work.  I recycled an old Boy Scout Pin for a backing to make a rose lapel pin and made matching earrings.  I don't have a picture unfortunately they were white white with a pink and green center.  These are not hard or expensive to make.  You just need to pick a color of polymer clay that you like.  You can buy these often on sale for 50% off from Michaels or Joann's but their every day price is about $2.79 for one package and you can make dozens of earrings with one package.  You will have to play with the clay and you can always start over.  This clay will last a long time even while open to the air.  It is great.  You can make flat shapes and put them together without gluing before baking and they will adhere without the use of glue.  These roses are a bit deep to use on a scrapbook page or a card but once the clay has been baked you can actually cut off some excess without compromising the rose shape.  You can cut them to make a flat surface for gluing the earring, bracelet, bobby pin or necklace platform.    I start by pinching off a small amount of clay and kneading it to make it softer and more plyable.  I then pinch off about a pettit pea size piece and roll it into a ball.  I squeeze it flat between my thumb and forefinger.  I pull it from my finger and roll it up for the center of the rose.  You continue this step and add (build) to your rose by placing the next petal  on the outside of the last.  You can see in the photo below  how the petals are placed.  The clay petals will cling to each other so do be careful before you commit to it's placement.  Continue to build your rose to the size desired.  I usually have between 5 and 7 petals in my roses.  I usually cut off the excess with a clay knife place on a oven safe plate and bake at 275 degrees for about 10 - 15 minutes for each 1/4" of thickness.  I ususally bake my roses for 10 minutes.  I have also made blackeyed susans, daisies, poinsettas and beads with polymer clay.  It is fun to play with, enjoy!  Julie
Hand Sculpted Rose Polymer Clay Post Earrings Vintage Inspired

Tuesday, October 18, 2011

Forget you not!

I want to apologize for not posting a thing so far in October.  I do have grandiose plans but they never seem to work out the way I want.  Of course I am not in charge of my life, but I keep forgetting.  I will get better about posting after the first week of November. 

I have a craft show in Long Beach on November 5th.  I am busy trying to make things to sell to the early holiday shoppers. I really wish I was a fulltime artist/crafter.  It is at the Methodist Church at the corner of Willow and Woodruff.  The address is 5950 E Willow, Long Beach, CA.  If you are local or don't mind taking a little drive come down and see all the ladies and gents that are selling their wares.  This is one craft fair that does not charge admission and you can get some lunch or baked goods and support the ladies of UMW by buying raffle tickets.  This will be the third year I have participated.  It is a fun day. 

I wanted to tell you that I had a couple of nice shout outs.  I consider myself blessed.  I think the Lord wants me to succeed with this adventure I am on.  Here are a couple of links to some other blogs that have recently recognized my work and shop.  The first blog has my Sunflower Trinket Box and the second blog is a sponsor thank you.  I sent them 50 Mummy wrappers for their swag bags for the So Cal Social that took place on October 8th.  Very nice of them.  Check them out.  Their blogs are much more sophisticated than mine.  Have fun!  

http://www.acollectivejournal.blogspot.com/


http://socalsocial.blogspot.com/2011/10/sponsor-highlight-highland-inspirations.html


Julie

Friday, September 30, 2011

Make Your Own Flowers 1

Hello Everyone,

If you are like me your stash of crafting supplies has out grown it's storage space.  I know mine has.  I have to come up with ways to stop spending money on supplies.  I have a rather large Rubber Maid container full of flowers from many different manufactures.  I bought most of them years ago when you could get 60 flowers for $5.99.  Now, I go into the shops and see the flowers available for cards and scrapbooks and have to pay $5.99 for just a few blooms.  I just can't afford these flowers and be competitive on Etsy.  If I want to make  2 dozen  Christmas cards with 3 poinsettas each, I'll go broke.  I don't want to stiffle my creativity that way.  So, what will I do?   I will make my own.  This is going to be a series of Blogs explaining how to make different kinds of flowers made from fabric, paper and more.  I hope this helps you as it has helped me.  Now I have another problem.  What to do with with all those other flowers?

Here are some easy to follow instructions for some flowers made of fabric scraps.

Instructions

Supplies


  • scraps of fabric
  • scissors
  • thread
  • hand-sewing needle
  • button (optional)
  • fray check (optional)

  1. Make Fabric Flowers

    • 1
      Cut two 4 inch squares of fabric, two 3 inch squares of fabric and two 2 inch squares of fabric.
    • 2
      Fold each square of fabric in half, then fold it in half again.
    • 3
      Trim the unfolded edges of the fabric into a scalloped shape. (The scallops don't have to be perfectly even to make a nice flower shape.)
    • 4
      Unfold the fabric, then cut slits between the scallops toward the center of the flower, without cutting the petals all the way apart. These slits will make it easier to fluff out the petals and make the flower more three-dimensional.
    • 5
      Place the two large flower pieces on top of each other. Pull the petals of the lower flower up through the slits between the upper petals, to make the flower petals fluffier.
    • 6
      Repeat step 5 with the pair of medium flower petals, and the pair of small flower petals.
    • 7
      Stack the flower petal pairs on top of each other, with the largest petals on the bottom and the smallest petals on the top. Make sure the petal pairs are centered.
    • 8
      Stitch the layers of the flower together through the center, using a few small hand stitches. Add a button to the center of the flower if you wish.
Have fun everyone.  Stay tuned there are more to come.  See you next time. Julie

Tuesday, September 20, 2011

New Tim Holtz Arrived Yesterday

I had completely forgotten that I preordered the Tim Holtz fall/leaf border.  When I opened the package I was so happy.  Even though I had several kits to put together I really wanted to play with it.  I got the kits done and started to put one together.  It turned out really nice.  I couldn't sleep last night, so I put it in my Etsy shop at  http://www.etsy.com/listing/82166389/lovely-fall-border-for-halloween

I'll tell you how I got the leaves to look like they are really are changing. 


If you plan on making a whole lot of leaves get the cardstock of your choice. I used 8.5 x 11inch piece of yellow or gold.  Take a warm red Color Box Chalk and swipe it gently as you don't want the sponge to fall off.  It doesn't matter if you can actually see the shape of the sponge because when you punch or die cut the paper you won't see it. You will just see the random color on the leaf.  They I use some pastel olive and more warm red to go around the edges and then a chestnut roan on just the tips.  They look great, don't they!

Take a look. I just love fall colors!

Sunday, September 18, 2011

Oh Happy Day!

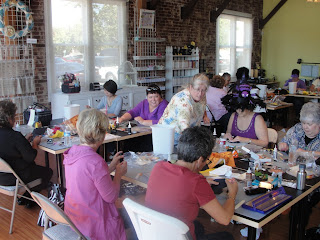
Wow!  What a day.  Today was my most successful class at Pages from the Heart in Monrovia.  We had 22 ladies sign up for the Halloween Treat Boxes class and one that walked in thinking she had signed up.  We were able to accomodate her so now I think I hold the record for the largest class at Pages.   It was a lot of work but the comments and smiles across every face just made my day.   Here are some photos from today's class.  I posted this class on my very first blog.  We had some real fun and met some new friends in the process.  Enjoy!

                                                                      Busy, busy

                                                                   19 people plus 4 kits

                                                                  This is Crazy fun!

                                                       Pages has nice space and product!

The gray haired lady with the french braid is me!
Some of the items we made today are in my Etsy shop at http://www.highlandinspirations.etsy.com/
I also have a download for the Mummy Wrapper by far the favorite treat box. 
Hope to see you soon!  Julie