It has been a long time but as promised here are some more videos for different coffee filter flowers.
enjoy!
http://www.youtube.com/watch?v=qRbhwU_t0Sk
http://www.youtube.com/watch?v=3HCxRRqlGvE
Tuesday, April 30, 2013

Monday, July 23, 2012
Hi Everyone!
I know I told you back in 2011 that I would blog some directions for flowers. I love prima flowers but I don't always have enough mad money (we are on a strict budget) to buy 6 flowers for $5. So, today I have a special link for you thanks to UKmaryanne. Fast and easy coffee filter flowers. Ubber cute and you could use all different kinds of flower dies and punches to get different shapes. These are basic directions that I read at work without sound. The directions seem really easy. I am going to try them too and post my results. Just click on the link below and use your imagination.
Have fun! Julie
http://www.youtube.com/watch?v=-1Bma2S7HSo&feature=related
I know I told you back in 2011 that I would blog some directions for flowers. I love prima flowers but I don't always have enough mad money (we are on a strict budget) to buy 6 flowers for $5. So, today I have a special link for you thanks to UKmaryanne. Fast and easy coffee filter flowers. Ubber cute and you could use all different kinds of flower dies and punches to get different shapes. These are basic directions that I read at work without sound. The directions seem really easy. I am going to try them too and post my results. Just click on the link below and use your imagination.
Have fun! Julie
http://www.youtube.com/watch?v=-1Bma2S7HSo&feature=related
Friday, July 6, 2012
Hi Everyone,
I amnot sure there is anyone out there but, if there is, I apologize for being so lax with this blog. Between my full time pay the bills job, the commute to get to my job (about 1 1/2 hour each way), teaching classes, and my Etsy shop I don't find much time for this blog. I am not complaining, really!
Today I was reminded of an easy technique to creating colored brads. I use my nail polish on plain brads (much less money if bought from a office supply store). Stick them in some floral foam so you can paint them around the edge holding the foam, not the brad. Two coats should do the trick. Then leave them for as long as you can, to dry and harden. If I know I will need some for a card class I try to do them a week in advance so they won't get finger prints on them. I have been able to buy wacky colors for as little as .50 cents a bottle at Wal-mart, but the prices could have gone up. I found some glittery black and bright green around Halloween. Purples, pinks, reds and oranges are easy to find but so are browns, nudes, and blues. Maybe all you ladies will be bolder in your nail color selections when you know you can use them for your scrapbooking and card making too.
Have Fun!
I amnot sure there is anyone out there but, if there is, I apologize for being so lax with this blog. Between my full time pay the bills job, the commute to get to my job (about 1 1/2 hour each way), teaching classes, and my Etsy shop I don't find much time for this blog. I am not complaining, really!
Today I was reminded of an easy technique to creating colored brads. I use my nail polish on plain brads (much less money if bought from a office supply store). Stick them in some floral foam so you can paint them around the edge holding the foam, not the brad. Two coats should do the trick. Then leave them for as long as you can, to dry and harden. If I know I will need some for a card class I try to do them a week in advance so they won't get finger prints on them. I have been able to buy wacky colors for as little as .50 cents a bottle at Wal-mart, but the prices could have gone up. I found some glittery black and bright green around Halloween. Purples, pinks, reds and oranges are easy to find but so are browns, nudes, and blues. Maybe all you ladies will be bolder in your nail color selections when you know you can use them for your scrapbooking and card making too.
Have Fun!
Monday, January 2, 2012
Happy New Year From Pasadena
It is actually January 2nd, but the Rose Parade in Pasadena is today. Last night my Husband and I went to visit our friend Susan who lives a block over from Orange Grove. This is the magical street that holds the Valley Hunt Club and the Wriggley Mansion also known as Tournament House. This is the step off for the most wonderful Parade in the world. Macy's may have their balloons but Pasadena has amazing flowers, seeds, spices and technology. They are totally amazing. These Floats are built in other places like in Azusa 10 miles away. They need to be driven to orange grove so bridges and street width all play a factor. These float disassemble or fold themselves to accomodate. Engineering feats of magic. We went to preview the floats last night, what a blast. I am up early so I can post these pictures before the parade is under way in another 45 minutes.


 Same Float different angle
 I think this is Paramount 100th Birthday Float
 Same Float Bumble Bee Tansformer it is 11pm and dark so it is hard to see
 I couldn't get close enough to see who's float this is.
 Bandai/Nomaco Games
 I don't know who it belongs to I'll have to watch this morning too
 Rear end of South PasadenaFloat
 Front end of South Pasadena Float
 Indonesia
 I think this is Thailand
 I don't know who this belongs too.
 Same float. They are bringing them on to Orange Grove so they are moving.
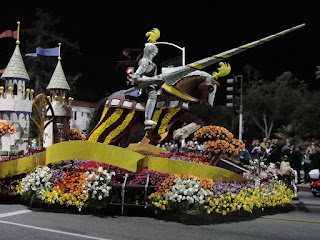 Odd Fellows and Rebekahs
 HGTV front
 HGTV back and on the move
 I don't know who's float this is, but it was fantastic
 Same Float with leopard in forground
 Same Float Tiger and temple Beautiful!
 City of Torrance
 I don't know the crowds were getting much bigger
 Girl Scouts
 I dont know who's float but I think he is a book worm but will be standing in the parade.
 I don't know who's float but is looked like a tribute to Elizabeth Taylor
More floats were arriving and this isn't all of them. It was great fun to walk around gawking at the floats and the crazy people from out of town in their Oregon and Wisconsin sweatshirts and caps. It was a great way to spend the first day of 2012. Happy 2012 to everyone! May it be a prosperous and healthy year for all.

That me doing the Rose Queen Wave

The Sierra Madre Float is completely made by volunteers
This is folded over so it can avoid wires ect.


More floats were arriving and this isn't all of them. It was great fun to walk around gawking at the floats and the crazy people from out of town in their Oregon and Wisconsin sweatshirts and caps. It was a great way to spend the first day of 2012. Happy 2012 to everyone! May it be a prosperous and healthy year for all.
Friday, December 2, 2011
Aftermath of Southern California Wind Storm December 1st 2011
I have lived on the east coast and none of the hurricanes I experienced were as bad as the wind storm I just experienced. Luckily our power was restored quickly after we lost power 6 times. We are on the same power grid as the hospital so we always seem to get restored first. It started late wednesday night around pm and just intensified. I couldn't see anything flying about but I could hear the tents of the Christmas tree lot across the street being ripped off poles clamouring, sirens all night trees and branches breaking the whole house shaking in the 97 mph winds. It was the scariest night ever zero sleep. In the morning this is what we found just in the one block where I live. We couldn't get out we were being diverted to other streets and I drove around in a loop about 1 mile square it took me an hour.
Here are the pictures. I don't think they do the destruction justice.


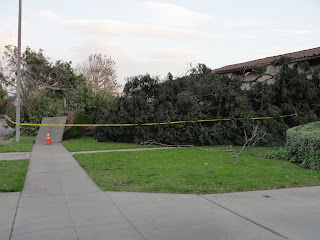


Here are the pictures. I don't think they do the destruction justice.


Friday, November 4, 2011
Polymer Clay Flowers
Don't forget tomorrow is the Los Altos Craft Fair everyone. It runs from 10am to 3 pm. You will be able to purchase handmade and manufactured products, baked goods, lunch and raffle tickets. It is a fun day. It takes place at the United Methodist Church. The address is 5950 E. Willow (at Woodruff), Long Beach, CA phone # is 562-598-2451. Get a start on your holiday shopping and help a good cause.
I made these flowers out of Polymer Clay. Don't they make cute earrings. I made a set for one of my friends at work. I recycled an old Boy Scout Pin for a backing to make a rose lapel pin and made matching earrings. I don't have a picture unfortunately they were white white with a pink and green center. These are not hard or expensive to make. You just need to pick a color of polymer clay that you like. You can buy these often on sale for 50% off from Michaels or Joann's but their every day price is about $2.79 for one package and you can make dozens of earrings with one package. You will have to play with the clay and you can always start over. This clay will last a long time even while open to the air. It is great. You can make flat shapes and put them together without gluing before baking and they will adhere without the use of glue. These roses are a bit deep to use on a scrapbook page or a card but once the clay has been baked you can actually cut off some excess without compromising the rose shape. You can cut them to make a flat surface for gluing the earring, bracelet, bobby pin or necklace platform. I start by pinching off a small amount of clay and kneading it to make it softer and more plyable. I then pinch off about a pettit pea size piece and roll it into a ball. I squeeze it flat between my thumb and forefinger. I pull it from my finger and roll it up for the center of the rose. You continue this step and add (build) to your rose by placing the next petal on the outside of the last. You can see in the photo below how the petals are placed. The clay petals will cling to each other so do be careful before you commit to it's placement. Continue to build your rose to the size desired. I usually have between 5 and 7 petals in my roses. I usually cut off the excess with a clay knife place on a oven safe plate and bake at 275 degrees for about 10 - 15 minutes for each 1/4" of thickness. I ususally bake my roses for 10 minutes. I have also made blackeyed susans, daisies, poinsettas and beads with polymer clay. It is fun to play with, enjoy! Julie

I made these flowers out of Polymer Clay. Don't they make cute earrings. I made a set for one of my friends at work. I recycled an old Boy Scout Pin for a backing to make a rose lapel pin and made matching earrings. I don't have a picture unfortunately they were white white with a pink and green center. These are not hard or expensive to make. You just need to pick a color of polymer clay that you like. You can buy these often on sale for 50% off from Michaels or Joann's but their every day price is about $2.79 for one package and you can make dozens of earrings with one package. You will have to play with the clay and you can always start over. This clay will last a long time even while open to the air. It is great. You can make flat shapes and put them together without gluing before baking and they will adhere without the use of glue. These roses are a bit deep to use on a scrapbook page or a card but once the clay has been baked you can actually cut off some excess without compromising the rose shape. You can cut them to make a flat surface for gluing the earring, bracelet, bobby pin or necklace platform. I start by pinching off a small amount of clay and kneading it to make it softer and more plyable. I then pinch off about a pettit pea size piece and roll it into a ball. I squeeze it flat between my thumb and forefinger. I pull it from my finger and roll it up for the center of the rose. You continue this step and add (build) to your rose by placing the next petal on the outside of the last. You can see in the photo below how the petals are placed. The clay petals will cling to each other so do be careful before you commit to it's placement. Continue to build your rose to the size desired. I usually have between 5 and 7 petals in my roses. I usually cut off the excess with a clay knife place on a oven safe plate and bake at 275 degrees for about 10 - 15 minutes for each 1/4" of thickness. I ususally bake my roses for 10 minutes. I have also made blackeyed susans, daisies, poinsettas and beads with polymer clay. It is fun to play with, enjoy! Julie
Tuesday, October 18, 2011
Forget you not!
I want to apologize for not posting a thing so far in October. I do have grandiose plans but they never seem to work out the way I want. Of course I am not in charge of my life, but I keep forgetting. I will get better about posting after the first week of November.
I have a craft show in Long Beach on November 5th. I am busy trying to make things to sell to the early holiday shoppers. I really wish I was a fulltime artist/crafter. It is at the Methodist Church at the corner of Willow and Woodruff. The address is 5950 E Willow, Long Beach, CA. If you are local or don't mind taking a little drive come down and see all the ladies and gents that are selling their wares. This is one craft fair that does not charge admission and you can get some lunch or baked goods and support the ladies of UMW by buying raffle tickets. This will be the third year I have participated. It is a fun day.
I wanted to tell you that I had a couple of nice shout outs. I consider myself blessed. I think the Lord wants me to succeed with this adventure I am on. Here are a couple of links to some other blogs that have recently recognized my work and shop. The first blog has my Sunflower Trinket Box and the second blog is a sponsor thank you. I sent them 50 Mummy wrappers for their swag bags for the So Cal Social that took place on October 8th. Very nice of them. Check them out. Their blogs are much more sophisticated than mine. Have fun!
http://www.acollectivejournal.blogspot.com/
http://socalsocial.blogspot.com/2011/10/sponsor-highlight-highland-inspirations.html
Julie
I have a craft show in Long Beach on November 5th. I am busy trying to make things to sell to the early holiday shoppers. I really wish I was a fulltime artist/crafter. It is at the Methodist Church at the corner of Willow and Woodruff. The address is 5950 E Willow, Long Beach, CA. If you are local or don't mind taking a little drive come down and see all the ladies and gents that are selling their wares. This is one craft fair that does not charge admission and you can get some lunch or baked goods and support the ladies of UMW by buying raffle tickets. This will be the third year I have participated. It is a fun day.
I wanted to tell you that I had a couple of nice shout outs. I consider myself blessed. I think the Lord wants me to succeed with this adventure I am on. Here are a couple of links to some other blogs that have recently recognized my work and shop. The first blog has my Sunflower Trinket Box and the second blog is a sponsor thank you. I sent them 50 Mummy wrappers for their swag bags for the So Cal Social that took place on October 8th. Very nice of them. Check them out. Their blogs are much more sophisticated than mine. Have fun!
http://www.acollectivejournal.blogspot.com/
http://socalsocial.blogspot.com/2011/10/sponsor-highlight-highland-inspirations.html
Julie
Subscribe to:
Posts (Atom)